
Wheat is the most widely grown food crop on the planet. According to the UN Food and Agriculture Organization, the world produced over 799 million tonnes of wheat in 2023, grown across roughly 221 million hectares. That scale alone tells you how much is riding on getting every stage of wheat growth right.
For farmers and agronomists, understanding the wheat growing stages is not optional knowledge. It determines when you apply nitrogen, when you spray for disease, when you irrigate, and ultimately, how much you harvest. Mistime an input by a few days and you either waste money or lose yield. Nail it, and the crop rewards you.
This guide covers the complete wheat life cycle, from seed germination to harvest-ready grain. You will find a clear stage-by-stage timeline with approximate days for each phase, the corresponding Feekes and Zadoks scale references, and practical management actions tied to each stage. Whether you grow winter or spring wheat, this breakdown gives you the reference you need to make better decisions in the field.
Wheat Growing Stages at a Glance: Timeline Overview
Before diving into each stage in detail, here is a quick reference table showing typical duration, scale references, and the most important management activity at each phase of wheat growth. Keep in mind that actual days will vary based on your variety, climate, and whether you are growing spring or winter wheat.
| Stage | Duration (Days) | Feekes Scale | Zadoks Scale | Key Activity |
| Germination | 7-14 | Feekes 1 | Z00-Z09 | Seed bed prep, even moisture |
| Seedling / Leaf Development | 10-14 | Feekes 1-2 | Z10-Z19 | Stand establishment, weed scouting |
| Tillering | 30-60 | Feekes 2-4 | Z20-Z29 | First nitrogen application (split) |
| Stem Elongation (Jointing) | 14-21 | Feekes 5-6 | Z30-Z39 | Second nitrogen, herbicide timing |
| Booting | 10-14 | Feekes 7-9 | Z40-Z49 | Flag leaf protection, fungicide scouting |
| Heading | 7-10 | Feekes 10 | Z50-Z59 | Monitor for Fusarium head blight |
| Flowering (Anthesis) | 4-7 | Feekes 10.5 | Z60-Z69 | Critical fungicide window |
| Grain Fill / Ripening | 20-35 | Feekes 11.1-11.2 | Z70-Z89 | Maintain moisture, disease watch |
| Maturity / Harvest | 7-14 | Feekes 11.3-11.4 | Z90-Z99 | Test grain moisture, harvest timing |
Now let us look at what is actually happening in the plant at each of these stages, and what you should be doing in the field.
Stage 1: Germination (Days 1-14)
Germination kicks off the moment a wheat seed absorbs enough moisture, roughly 35-45% of its own weight. Once that threshold is crossed, the seed activates internal enzymes and the growth process begins. The radicle, which becomes the primary root, emerges first. Then the coleoptile, a protective sheath around the shoot, pushes up through the soil. When the coleoptile breaks the surface and the first true leaf appears, germination is complete.
Soil temperature is the biggest factor controlling how fast this happens. Wheat can germinate across a range of 4 to 37 degrees Celsius, but the ideal window sits between 12 and 25 degrees Celsius. Below that range, emergence slows significantly. Above it, seedling vigor suffers.
What to Watch For
• Uneven emergence often signals depth inconsistency during seeding
• Poor germination under cold, wet soils can allow Pythium and damping-off diseases to take hold
• Sow at 1 to 1.5 inches depth for most soil types
• Spring wheat is typically planted when the 10-day average soil temperature rises above 5 degrees Celsius
This stage corresponds to Feekes 1 and Zadoks Z00-Z09. At the Zadoks 09 stage, the coleoptile has broken the soil surface, which marks successful seedling emergence.
Stage 2: Leaf Development and Seedling Establishment (Days 10-25)
After the coleoptile tip opens and the first true leaf unfolds, the plant enters the leaf development phase. At this point, the seedling depends entirely on energy stored in the endosperm until the leaf system is active enough to photosynthesize on its own. Leaves continue to emerge at a rate of roughly one every four to five days, typically up to nine total before tillering begins.
This is also when the root system expands rapidly. Seminal roots from germination are joined by nodal roots, which form the plant’s permanent root system and drive nutrient uptake through the rest of the growing season.
On the scales, this maps to Feekes 1-2 and Zadoks Z10-Z19, with the second digit in the Zadoks code indicating how many leaves have emerged. At Z13, for example, three leaves are fully unfolded. Knowing this stage matters for your precision agriculture technology decisions, particularly remote sensing applications that rely on leaf area index for early crop assessment.
What to Watch For
• Scout for aphids early, especially barley yellow dwarf virus transmitted by bird cherry-oat aphids
• Apply pre-emergence or early post-emergence herbicides before weeds compete for light and nutrients
• Do not apply split nitrogen yet. The plant cannot use it efficiently at this point
Stage 3: Tillering (Days 20-80)
Tillering is one of the most important growth stages for determining final yield potential. Once the plant has 3-4 leaves, side shoots called tillers begin emerging from the base. Each tiller has the potential to develop its own head and produce grain. A single wheat plant may produce anywhere from 2 to 8 tillers under optimal conditions.
This stage takes longer than most others, typically 30 to 60 days, partly because winter wheat goes dormant during this period if conditions turn cold. For winter wheat varieties, tillering continues into late fall, pauses through winter dormancy, and resumes at spring green-up. Spring wheat varieties complete tillering more continuously.
On the Feekes scale, this is stages 2 through 4. On the Zadoks scale, it runs from Z20 to Z29, with each increment representing one more visible tiller. Understanding which tillers will contribute to yield is part of building a comprehensive guide to ERP data management strategy for your farm inputs.
Key Management Action: First Nitrogen Application
The first split nitrogen application is recommended at green-up for winter wheat, which is early tillering resumption in spring. For spring wheat, it occurs during active tiller development. Research from land-grant universities shows that proper nitrogen timing by growth stage, not calendar date, is essential for maximizing fertilizer efficiency and yield.
• Apply herbicides for broadleaf weeds at Feekes 2-4 while the growing point is still below the soil surface
• Thin stands with fewer than 15-20 plants per square foot may not tiller enough to compensate
• Avoid applying growth regulators before Feekes 4, as they can injure young tillers
No-till practices that leave crop residue from prior seasons can sometimes delay soil warming and slow early tillering. If you rely on data-driven decision tools, monitoring biomass accumulation in real time at this stage can improve your input timing precision.
Stage 4: Stem Elongation and Jointing (Days 60-95)
Stem elongation begins when internodes, the sections between nodes on the main stem, start to lengthen and push upward. The most visible sign of this stage is jointing, which happens at Feekes 6 or Zadoks Z30. At jointing, the first node becomes detectable at or near the soil surface, roughly 1 cm above the tillering node. This is a critical marker because the growing point is now above ground level, which means it is vulnerable to frost damage for the first time.
The flag leaf, the topmost leaf, develops during late stem elongation and is significant because it contributes a large share of photosynthate that fills the grain. Protecting the flag leaf from disease and stress during this period has a direct impact on yield.
On the Zadoks scale, this phase runs from Z30 to Z39. At Z39, the flag leaf is fully unrolled and the ligule is visible. If you are using digital transformation in agriculture tools for field monitoring, this is a stage where satellite NDVI imagery can help you identify variability in crop height and canopy development across large fields.
Key Management Actions
• Apply the second nitrogen split at Feekes 5-6 to improve seed number per head and seed size
• Apply herbicides with systemic activity before Feekes 6 to avoid stem damage
• Begin scouting for stripe rust and powdery mildew, which can appear early in this stage
• Frost after jointing can kill the growing point. If nighttime temperatures drop below minus 1 to minus 2 degrees Celsius, assess for freeze damage
Stage 5: Booting (Days 85-110)
During booting, the wheat head, or spike, is fully formed inside the flag leaf sheath but has not yet emerged. The sheath visibly swells as the head develops inside it. You can feel the head if you gently squeeze the stem just below the flag leaf. The number of spikelets per head is already determined at this point, which directly limits the maximum number of kernels possible.
This stage lasts 10 to 14 days and corresponds to Feekes 7-9 and Zadoks Z40-Z49. At Zadoks Z41, the flag leaf sheath is just beginning to extend. By Z49, the first awns appear in varieties that have them.
What to Watch For
• Armyworm larvae can feed heavily on flag leaves and heads during booting. Scouting thresholds typically sit at 1 larva per row foot
• Water stress at booting reduces spikelet fertility and can cut grain number per head significantly
• Avoid any leaf burn from foliar applications that could damage the flag leaf
Tracking field variability in real time during booting is valuable, particularly in larger operations. Agricultural water management decisions at this stage should prioritize maintaining soil moisture in the top 12-18 inches of the profile.
Stage 6: Heading and Ear Emergence (Days 100-115)
Heading begins when the tip of the head starts to emerge from the flag leaf sheath. This is Feekes 10 and Zadoks Z51. The process takes 7 to 10 days, ending when the head is fully emerged from the sheath (Zadoks Z59). By this point, the final number of spikelets and potential kernel sites is set.
Heading is one of the most recognizable stages in wheat growth because the field visually transitions from a leafy canopy to a sea of emerging heads.
This stage is closely tied to the wheat life cycle concept of reproductive development, where the crop shifts from vegetative to reproductive growth. If you grow wheat as part of a mixed farming operation, this transition point is worth tracking alongside your supply chain tracking in agriculture workflows, particularly if you forward-sell grain at specific quality grades tied to variety and maturity timing.
Key Management Actions
• Scout for Fusarium head blight (scab) starting at heading, especially in humid conditions or after rainfall
• Do not apply systemic fungicides to flag leaves for the first time at heading; the window for effective protection of the flag leaf has already passed
• If you plan to apply foliar nutrients at this stage, be aware that absorption through the waxy flag leaf surface is limited
Stage 7: Flowering and Anthesis (Days 107-122)
Flowering in wheat is easy to miss if you are not looking for it. The anthers, small yellow or cream-colored structures, extrude from the florets in the middle of the head first, then progress toward the top and bottom. Full flowering takes 4 to 7 days per head. This is Feekes 10.5 and Zadoks Z65.
Pollination is primarily self-fertilization in wheat, with each floret pollinating itself before the anthers are fully extruded. Temperature extremes, particularly above 30 degrees Celsius or below 4 degrees Celsius during anthesis, can disrupt pollination and reduce grain set significantly.
This is the single most critical window for fungicide application targeting Fusarium head blight (scab). University and extension research consistently confirms that the best timing for triazole fungicides is at early anthesis, Feekes 10.5.1, when about 50% of the heads are at early flowering. Missing this window by even two to three days significantly reduces efficacy.
Across farming operations that track multiple fields and varieties with different maturity dates, coordinating this timing requires good data. Tools built around precision livestock farming technologies and crop management platforms share the same underlying principle: the right intervention at the right moment produces better outcomes.
Stage 8: Grain Filling and Ripening (Days 115-150)
After fertilization, each fertilized floret begins developing a kernel. Grain filling progresses through several sub-stages: watery ripe, milk stage, dough stage, and hard dough. These are captured in Zadoks codes Z71 through Z89.
During milk stage (Zadoks Z75), the kernel has reached its final size but the contents are still liquid and white. By medium milk (Z77), the kernel is green and full-sized. As the dough stages progress, the contents thicken and the kernel starts to dehydrate. Dry matter accumulation in the grain continues until physiological maturity, after which no more filling occurs regardless of how long the plant stands.
This stage spans 20 to 35 days and is where the bulk of harvestable yield is built. Each day of stress, whether from heat, drought, or disease, during grain fill reduces final kernel weight. Even a few days of severe heat above 35 degrees Celsius during early grain fill can cause significant test weight loss. Understanding how soil health, moisture, and nutrient management interact during this period is part of what separates top agtech companies‘s data-driven approach from traditional guesswork.
Key Management Actions
• Maintain adequate soil moisture through the early dough stage. Stress after hard dough has minimal yield impact
• Scout for aphids on the flag leaf and heads. Populations above threshold can still reduce grain fill even this late
• Do not apply nitrogen at this stage. It will not improve yield and may increase disease pressure from rusts
Stage 9: Maturity and Harvest (Days 145-165+)
Physiological maturity is reached when the kernel reaches its maximum dry weight and a black or dark layer forms at the base of the grain (the black layer). At this point, the kernel moisture is typically around 35-40%. The grain continues to dry down after physiological maturity as the plant senesces. Harvest can proceed once grain moisture drops to 13-14% for safe storage, which corresponds to Feekes 11.4 and Zadoks Z92.
For spring wheat, the full growing season from planting to harvest typically spans 100 to 130 days. Winter wheat requires 180 to 250 days due to the extended dormancy period through the cold months.
Timing harvest correctly matters as much as managing any earlier stage. Delayed harvest after grain moisture reaches safe levels exposes the crop to weather damage, lodging, and pre-harvest sprouting. If you use farm management software or data systems, linking agriculture data management workflows to real-time moisture monitoring makes harvest scheduling significantly more precise.
What to Watch For
• Check grain for pre-harvest sprouting if wet weather arrives after physiological maturity
• Test grain moisture before combining. Grain above 14% will require drying costs
• Monitor for lodging, which can make combining difficult and slow harvest significantly
Spring Wheat vs. Winter Wheat: How the Timelines Differ
The wheat growing stages are biologically the same whether you are growing spring or winter wheat. The difference lies in how and when each stage happens relative to the calendar.
Spring wheat is planted in early spring, once soil temperatures consistently exceed 5 degrees Celsius. It goes through germination, tillering, stem elongation, heading, flowering, and grain fill in a continuous sequence, completing the full wheat life cycle in roughly 100 to 130 days. There is no dormancy break.
Winter wheat is planted in the fall, typically September through November in the northern hemisphere. It germinates and begins tillering before cold temperatures slow or halt growth. The plant vernalizes, meaning it requires a cold period to trigger normal heading later in the season. After dormancy breaks in spring, the crop accelerates through the remaining wheat growth stages. Total growing time from planting to harvest is 180 to 250 days. Farmers who manage both types face different input timing calendars. Integrating that data into a fourth agricultural revolution-ready farm management system keeps all of it organized and accessible.
How to Accurately Identify Wheat Growth Stages in the Field
You cannot rely on calendar dates alone to identify where your wheat is in its development. Growth rate varies with temperature, variety, and field conditions. You have to physically examine plants.
The two most widely used staging systems are the Feekes scale and the Zadoks scale. The Feekes scale runs from 1 to 11.4 and is commonly used in the United States, particularly in extension literature. The Zadoks scale is a two-digit system from 00 to 99 that is more detailed and internationally used. Both systems describe the same biological progression, just with different levels of granularity.
Practical field scouting at each stage requires looking at the right structures: counting leaves, checking for visible nodes, feeling for the head inside the boot, looking for extruded anthers. No digital tool replaces this physical examination for precise staging, though many crop monitoring platforms use it as a calibration point.
Building a consistent scouting protocol across your fields, and tying that data to your input decisions, is part of what separates high-performing operations from average ones. Connecting that agronomic knowledge to broader farm operations is what Folio3 AgTech’s crop management software is built to support.
Common Mistakes Farmers Make Across Wheat Growing Stages
Even experienced growers miss yield potential by making timing errors tied to misidentifying wheat growth stages. Here are the most common ones.
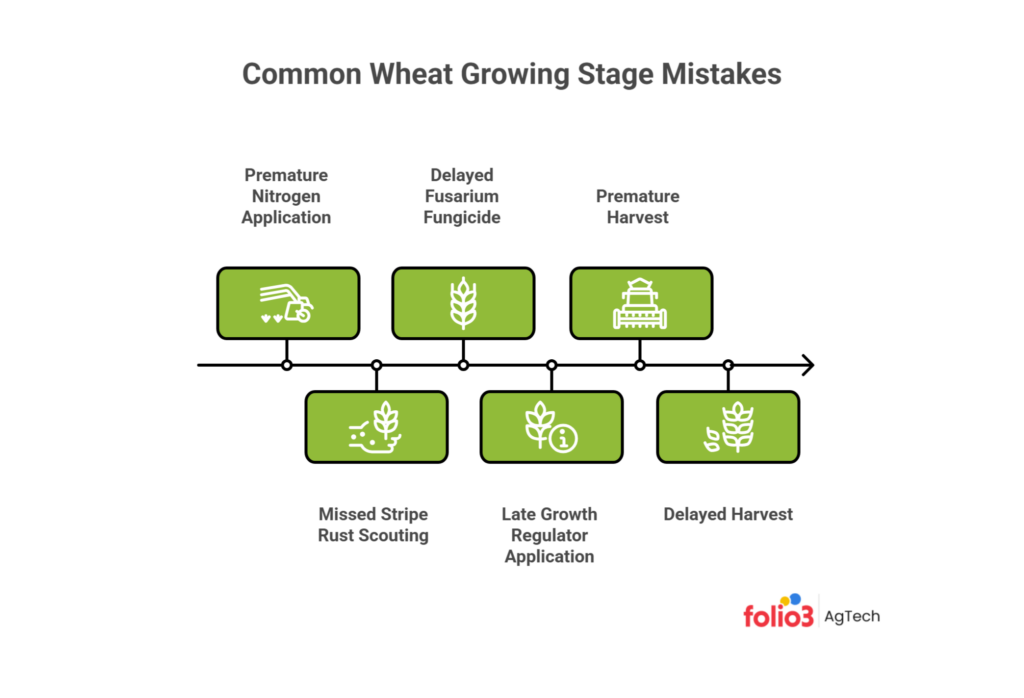
• Applying the first nitrogen application too early, before the plant can efficiently take it up during early tillering
• Delaying the Fusarium head blight fungicide until heads are fully emerged, missing the peak efficacy window at early anthesis
• Not scouting for stripe rust during stem elongation, when early infections are still manageable with targeted fungicides
• Applying growth regulators after jointing, which can cause stem damage and reduce head emergence
• Harvesting too early because the crop looks ready, while grain moisture is still above safe storage levels
• Delaying harvest after grain reaches physiological maturity, exposing dry-down grain to weather and pre-harvest sprouting risk
Each of these mistakes links back to one core issue: not knowing exactly where the crop is in its life cycle. Consistent scouting and good record keeping across growing seasons helps you build a reliable decision-making framework for your specific varieties and climate.
Conclusion
Wheat grows through nine distinct stages from germination to harvest, and each one matters. The total wheat growing stages timeline spans 100 to 130 days for spring wheat and 180 to 250 days for winter wheat, but the actual field decisions that shape yield happen within much tighter windows at each phase.
Nitrogen goes in at tillering and jointing. Fungicide timing at anthesis is critical for scab protection. Water stress at booting and grain fill cuts kernel number and weight. None of these inputs work well if you apply them at the wrong stage.
If you manage wheat production at scale, connecting your agronomic scouting data to your broader farm operations improves every input decision. Folio3 AgTech’s crop management solutions are built for exactly that, helping you bridge field-level crop data with operational and financial planning.
FAQs
How Many Days Does Each Wheat Growing Stage Take?
The duration varies by stage and variety. Germination takes 7-14 days, tillering 30-60 days, stem elongation 14-21 days, booting 10-14 days, heading 7-10 days, flowering 4-7 days, grain fill 20-35 days, and maturity 7-14 days. Spring wheat completes the full cycle in 100-130 days, while winter wheat takes 180-250 days including dormancy.
What Is the Difference Between the Feekes and Zadoks Scale?
Both scales describe the same wheat growth stages but at different levels of detail. The Feekes scale runs from 1 to 11.4 and is commonly used in North America, particularly in extension guides. The Zadoks scale is a two-digit system from 00 to 99, is more granular, and is widely used internationally and in research. The Zadoks system allows for more precise staging because each stage is broken into sub-stages.
When Should I Apply Nitrogen to Wheat?
For winter wheat, the first nitrogen application in a split program is recommended at spring green-up, which coincides with early tillering resumption. The second application goes at stem elongation, around Feekes 5-6. For spring wheat, the first nitrogen goes during active tillering. Late-season nitrogen after Feekes 8 generally improves grain protein but does not add yield and can increase rust risk.
What Is the Most Critical Stage for Wheat Yield?
There is no single most critical stage because each phase influences a different yield component. Tillering sets the number of heads per unit area. Stem elongation and booting determine spikelet number per head. Grain fill sets kernel weight. However, if forced to choose one, grain fill from flowering to the dough stage is where most of the harvestable yield is physically built, and stress during this period has the most direct impact on final output.
How Do I Know When Wheat Is Ready to Harvest?
Wheat is ready to harvest when the grain has reached physiological maturity and dried down to 13-14% moisture. Physiological maturity can be confirmed by checking for the black layer at the base of the kernel and by observing that all plant material is golden yellow with no green remaining in the straw. Test grain moisture with a moisture meter before combining to avoid excessive drying costs or storage issues.
How Does Drought Affect the Wheat Life Cycle?
Drought affects wheat differently depending on which stage it hits. Stress at germination delays emergence and reduces stand uniformity. Drought at booting reduces spikelet fertility and cuts potential grain number per head. Water stress during grain fill directly reduces kernel weight, which is the most damaging in terms of final yield. Winter wheat has some advantage because much of its early growth depends on fall moisture and snowmelt, but spring and early summer drought at reproductive stages is a serious threat.