
Incubating chicken eggs is simple on paper—21 days, a warm box, and patience, but consistent hatching eggs requires control. This guide gives you a day-by-day system you can run like an operator: how to choose and store eggs, dial in temperature and humidity, turn correctly through lockdown, and avoid the small mistakes that quietly cut hatch rates. Follow the checks, keep it steady, and you’ll hatch healthier chicks with far less guesswork.
What Successful Hatches Really Require – 60-Second Overview
Incubation for chicken eggs works when you run it like a controlled environment. Hold stable setpoints for days 1–18, then shift conditions for the hatch window so the chicken egg hatching process can finish without stalls. Forced-air incubators are commonly set around 99.5–100°F; still-air units run slightly higher, measured at the top of the eggs.
Humidity is the other lever. Many guides hold moderate humidity (about 45–55% RH) during incubation and raise it to roughly 65–70% RH for lockdown so chicks can pip and hatch without membranes drying out.
Before you set any eggs, verify readings with a second thermometer and a hygrometer so you’re not chasing bad sensors.
For egg hatching, steady beats are perfect; avoid big swings from frequent opening, drafts, or poor placement.
The 4 Controls You Must Keep Stable
- Temperature: match setpoints to forced-air vs still-air and measure at egg height.
- Humidity: run incubation RH, then increase for lockdown (days 19–21).
- Turning: turn at least 3x/day through day 18, then stop.
- Ventilation + placement: keep the unit in a steady room and increase ventilation as embryos grow.
Incubation Setpoints Cheat Sheet:
| Incubator type | Days 1–18 temp | Days 1–18 RH% | Days 19–21 RH% | Turning |
| Forced-air (fan) | 99.5–100°F | 45–55% | 65–70% | Min. 3x/day through Day 18; stop at lockdown |
| Still-air (no fan) | 101–102°F | 45–55% | 65–70% | Min. 3x/day through Day 18; stop at lockdown |
How to Choose the Right Eggs Before You Start
If you want predictable results when you’re hatching chicken eggs, start by controlling what you can control: the eggs you set. Eggs that are cracked, misshapen, excessively dirty, or unusually small/large rarely hatch well and can contaminate the rest of the batch.
For best results, set eggs as fresh as you can, many experts recommend within a week and warn that hatchability drops after about 10 days.
What “Good Hatching Eggs” Look Like
- Sound shell, normal shape: Discard eggs with cracks or obvious defects.
- Clean (not scrubbed): Don’t set heavily soiled eggs.
- Hairline cracks are hatch killers: Fine cracks increase dehydration and contamination risk and can reduce hatchability.
- Candle before setting (for cracks): A quick pre-set candle helps you spot hairline cracks you’ll miss in normal light, then you simply don’t set them.
Storage + “Resting Eggs”
Let shipped eggs rest upright (large end up) for ~24 hours so contents settle before you start hatching eggs in an incubator. If you can’t set immediately, store fertile eggs cool and humid; commonly 55–65°F and about 75% relative humidity, and turn stored eggs if holding more than a week.
Also, avoid moving cold eggs straight into a warm, humid incubator; condensation and thermal shock can crack shells and kill embryos.
Biosecurity in One Minute
- Wash hands (or use clean gloves) before handling eggs to reduce transferring oils and microbes.
- Don’t wash hatching eggs unless necessary, as washing can remove natural defenses and help bacteria move through shell pores.
- Remove broken or leaking eggs immediately, as they’re rarely viable and can contaminate the incubator.
- Keep the area clean and dry to lower dust and grime around eggs, so you’re not incubating bacteria along with chicks.
How to Develop an Incubator Setup That Doesn’t Drift
If you run a farm, you already know: “close enough” settings create inconsistent outcomes. Incubation is the same. Before Day 1, build an environment that holds the incubation temperature for chicken eggs and avoids swings when the room warms up, cools down, or the lid opens.
Many hatch problems come from drift, temperature layering, humidity leaks, weak ventilation, and poor placement. So, start by choosing the right incubator type, then back it with simple verification tools.
Forced-Air vs Still-Air
- Forced-air (fan) incubators circulate heat, so temperature is more uniform. Common guidance is about 99–100°F (≈99.5°F) for forced-air units.
- Still-air (no fan) incubators stratify; the top and bottom can differ by several degrees. So, the temperature for incubating chicken eggs must be set and measured at egg height/top-of-egg, and the setpoint is typically higher.
- Opening the unit multiple times daily to exchange air/oxygen, so routine and room stability matter more than you think.
The “Minimum Viable Kit” for Reliable Hatches
- Incubator + independent thermometer/hygrometer: Don’t trust the factory gauge blindly, cross-check with a second thermometer.
- Turner (automatic or manual): Turning is critical; a common baseline is at least 3 turns/day during the main incubation window. Automatic turning reduces lid openings and helps stability.
- If the turner motor sits inside the incubator, run it during your test cycle; small motors add heat and can shift your final incubation temperature for the chicken.
Placement Rules
- Place the unit away from drafts and direct sunlight and avoid windows; keep it in a steady indoor location, often an inside wall.
- Aim for a stable room temperature, so the incubator isn’t fighting the environment all day.
- Keep it out of high-traffic areas where it can be bumped, unplugged, or repeatedly disturbed.
Calibration + Pre-Flight Checklist (Day -1 to Day 0)
You’re aiming for one outcome: make Day 1 boring. The incubator should already be holding the incubation temperature for chicken eggs and the humidity for hatching chicken eggs without constant knob-turning.
Clean and Sanitize
Eggshells are porous, and microbes in an incubator can reduce hatchability, so sanitation is not optional.
- Wash and disinfect per reliable guidance.
- Let all parts air-dry completely before reassembling and powering on.
Run a Test Cycle
- Run the incubator at least 24 hours to confirm it can hold temperature and humidity across a full day/night cycle.
- Running the incubator for several hours (or overnight) with water in place to stabilize the internal atmosphere before eggs are set; if you have time, test it for several days.
- Run your automatic turner during the test (turner motors add heat), and build humidity with warm water before eggs go in.
Calibration Sanity Check
- Place your thermometer/hygrometer at egg level/top-of-egg height, away from the heat source, especially in still-air units where temperatures layer.
- Cross-check with a second thermometer or a medical thermometer nearby, so you know which device is lying.
- Once readings are stable, avoid chasing tiny fluctuations; the target is a consistent incubation temperature for chicken, not constant tinkering.
The Day 1 to 21 Incubation Operating Plan
The incubation period for chicken eggs is about 21 days, but your hatch rate depends on how steady you run the system. Use the schedule below to standardize your daily actions, avoid unnecessary lid openings, and protect the hatch window with a strict lockdown. This is the simplest way to make the chicken egg hatching process repeatable, batch after batch.
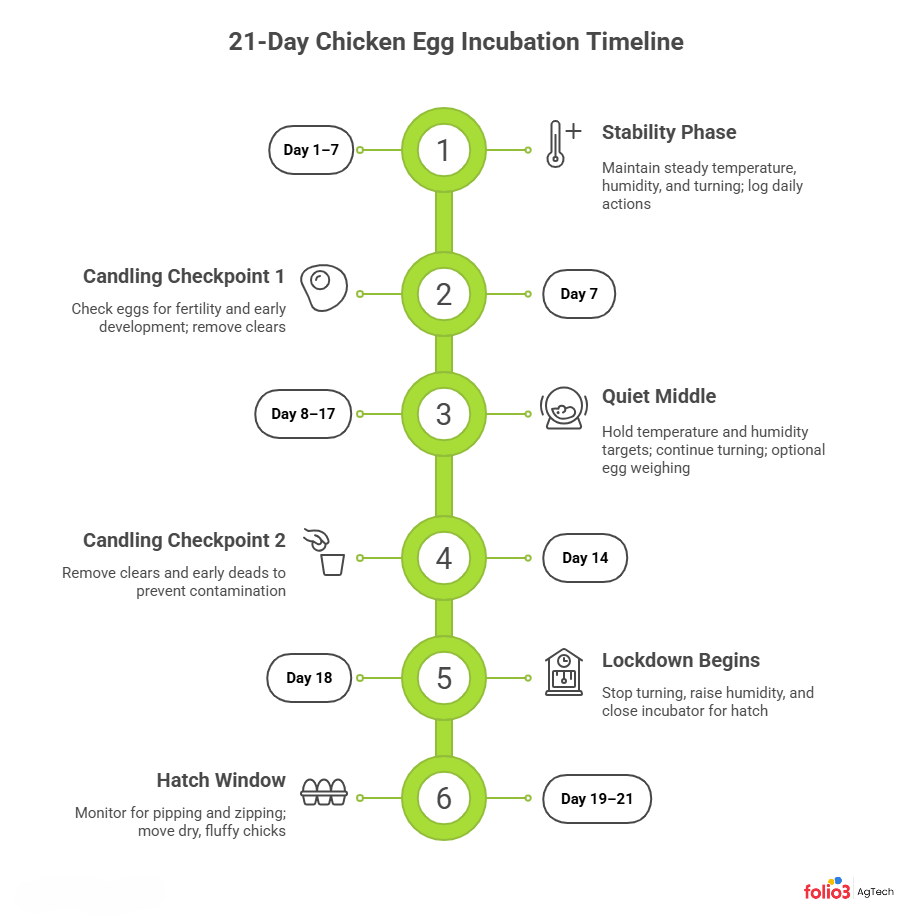
Days 1–7: Establish Stability (Don’t Over-Adjust)
Week one is about stability, not perfection. Keep your temperature and humidity steady, and turn consistently. A practical standard is turning three to five times a day for the first 18 days, or using an automatic turner to reduce openings. Use a quick “same-time-every-day” log so you spot real drift instead of reacting to regular fluctuations.
When you candle later, a healthy, developing egg should show early blood vessels and a darker embryo area; a clear egg is often infertile or an early failure.
Day 7 (or Day 7–10): Candling Checkpoint #1
Candling is your first quality gate. It is recommended to start around day 5–7. In simple terms:
- Developing: veins + a dark spot.
- Clear: mostly transparent (often infertile).
- Blood ring / early dead: disrupted vessels can appear as a dark ring.
Keep it fast and clean; over-handling increases contamination risk.
Days 8–17: The “Quiet Middle” That Wins Hatches
This stretch decides most of your results because it’s long, and boredom is your friend. Hold temperature targets based on incubator type (99.5°F forced-air; 100–101°F still-air) and keep incubation humidity in the mid range (45–50% RH; Fresh Eggs Daily uses 40–50%). Continue turning through day 18.
Optional operator upgrade (humidity check): weigh a small sample of eggs. Eggs incubated correctly lose about 11–12% of their weight by 18 days; aiming for ~12% by day 18. Use it as a trend check, adjust humidity gradually if you’re consistently off.
Day 14: Candling Checkpoint #2 (Remove Risks)
Day 14 candling is risk control. Remove clearings and early deads so they don’t become a hygiene problem. It reduces the risk of a rotten egg exploding and contaminating the hatch; FAO guidance similarly advises discarding clear eggs and those showing early death indicators.
Day 18: Lockdown (Where Most People Lose the Hatch)
Lockdown starts on day 18. Stop turning and raise the humidity for the last three days. Increase humidity to roughly 65–70% for days 19–21 and stop turning at day 18, as days 18–21 are known as lockdown with no turning and higher humidity.
“Shrink-wrapping” is when membranes dry and tighten around the chick during hatch. Raising humidity during lockdown so membranes don’t dry out and “shrink wrap” chicks. At last, your best protection is simple: keep the lid closed.
Days 19–21: Hatch Window (What’s Normal vs Not)
Expect pipping, long pauses, and uneven timing. After a chick makes the first hole, it can rest for hours while its lungs adjust; humidity is critical, so don’t open the incubator until most chicks have hatched. Avoid premature assistance, as helping too soon can injure or infect chicks.
Two terms you’ll hear: pipping (the first hole) and zipping (when the chick cuts a line around the shell). The gap between them can be hours, and that “rest phase” is normal; opening the lid to check progress is what dries membranes and stalls hatch.
Move chicks only when they are dry and fluffy. It is usually about 24 hours, and Fresh Eggs Daily recommends 12–24 hours once they’re dry, fluffy, and getting active.
Day 1–21 Incubation Schedule:
| Day range | Target temp | Target humidity | Turning rule | What to check | What not to do |
| Day 0 | Air 99–101°F | 45–50% RH | Start turning | Readings at egg level | Don’t stabilize by repeated opening |
| Days 1–6 | Same | 40–50% RH | Turn 3–5x/day | Daily log: temp/RH + water | Don’t chase tiny swings |
| Day 7–10 | Same | Same | Keep turning | Mark results | Don’t over-handle |
| Days 11–13 | Same | Same | Keep turning | Trend check | Don’t open “just to look” |
| Day 14 | Same | Same | Keep turning | Remove non-viable eggs | Don’t leave suspect eggs in |
| Days 15–17 | Same | Same | Keep turning | Weigh sample eggs | Don’t make big humidity jumps |
| Day 18 | Same | 65–70% RH | Stop turning | Refill water; set vents | Don’t open the incubator |
| Days 19–21 | Same | 65–70% RH | No turning | Observe through the window | Don’t help early |
If you’re managing multiple hatches or flocks, tools like poultry management software help you log incubation data, hatch outcomes, and chick performance in one place.
Troubleshooting for Hatching Chicken Eggs
When egg hatching doesn’t go to plan, most people start changing three things at once: temperature, humidity, and opening frequency. As a result, they never learn what actually caused the failure.
So, your best move is to treat every hatch like a controlled run: confirm the symptom, check one variable, and apply a single corrective action. It is clear that even small temperature errors can reduce hatch quality and timing, so verification is your fastest path to better hatching chick outcomes.
Hatch Failure Diagnosis Matrix:
| Non-viable eggs are turning rotten and contaminating the incubator | Likely cause | What to confirm | Corrective action | Prevention next hatch |
| Hatch starts early (Day 19–20) | Incubator temperature too high | Compare incubator reading vs a second thermometer at egg level | Stop “tweaking” and reset to recommended target | Pre-run calibration; protect incubator from hot room swings |
| Hatch is late (Day 22+) | Incubator temperature too low | Cross-check with second thermometer; check for drafts/sun exposure | Correct setpoint and stabilize room; minimize openings | Stable placement + pre-flight test run; log readings daily |
| Sticky chicks (stalled zips) | Humidity too low during hatch or frequent lid opening drops humidity | Review lockdown RH and how often lid was opened | Increase humidity to lockdown range and keep lid closed | Raise RH and don’t open incubator |
| Low hatch rate in shipped eggs | Rough handling and temperature exposure can reduce viability | Confirm eggs were shipped; note delays and cold exposure risk | Rest eggs before setting to run a strict, stable cycle | Follow shipped-egg handling guidance; avoid rapid temperature changes |
| Rotten smell; risk of explosion | Non-viable egg turning rotten and contaminating the incubator | Candle and identify clears/early deads; watch for odor or leakage | Remove suspect eggs as soon as identified before lockdown | Candle on schedule to remove non-viables and reduce contamination risk |
“Don’t Touch These 5 Things” During Lockdown
Lockdown (final 3 days) is where most hatches fail, not because you did nothing, but because you did too much.
- Don’t open the incubator “to check progress.” Humidity dumps fast and can dry membranes.
- Don’t keep turning after Day 18. Chicks need to position for hatch.
- Don’t let humidity fall below the lockdown range. The goal is to protect the hatch process.
- Don’t move eggs around. Keep the environment stable and undisturbed.
- Don’t “help” early. Give pipped chicks time; interference can backfire.
Post-Hatch: First 72 Hours
The hatch feels like the finish line, but the first 72 hours are where you protect hatching chicks. After egg hatching, leave chicks in the incubator until they are dry and fluffy, then move them quickly, in batches, to avoid drying unhatched eggs. Chicks can be left until their down is dry (usually about 24 hours), and they won’t require food or drink in that time.
When to Move Chicks and What “Ready” Looks Like
Move chicks when they are:
- Dry and fluffy (no wet down)
- Active and steady on their feet
- Breathing normally and not chilled
During the hatch window, humidity is critical, so you shouldn’t open the incubator until most chicks have hatched. Transfer the dry ones to a pre-warmed brooder, then close up fast.
Cleanup and Reset
Clean immediately after the hatch while the residue is easy to remove. Use a diluted bleach solution (1:100) for incubator cleaning, followed by thorough drying before storage or the next set.
For an extension-safe option, use 1 teaspoon of household bleach per gallon of water as an inexpensive disinfecting solution, and don’t exceed that dilution due to corrosion.
Hatch Metrics for Farm Managers
If you’re running incubation for chicken eggs as an operation, track outcomes the same way every hatch across batches and seasons, reliably. Use “hatch of fertile” alongside hatchability, so you can tell whether losses are driven by fertility or by your hatch process.
The Only 3 Numbers You Need
- Hatch of set (%): Chicks hatched ÷ eggs set (eggs incubated). It is your end-to-end result, combining fertility + incubation execution.
- Hatch of fertile (%): Chicks hatched ÷ fertile eggs. It isolates how well you ran the hatch environment.
- Late death rate: Late-stage embryo losses are often classed as “late dead,” ~day 15–21 in breakout analysis.
Next hatch action loop: verify thermometers/hygrometers, adjust one variable (temperature or humidity) for the whole hatch, and compare these three metrics again. That’s how you improve hatching chicken eggs without guesswork.
Conclusion
Successful incubation for chicken eggs is not “luck”; it’s stable setpoints, disciplined turning, clean handling, and a strict lockdown that protects the hatch window. Use the Day 1–21 operating plan, candle on schedule, and make one controlled change per hatch based on your metrics. When you standardize your process, hatching chicken eggs becomes repeatable and far less stressful. If you want to run hatching as a trackable farm workflow, book a free consultation with our Agtech experts to build a poultry management software customized to the unique requirements of your poultry farm.
FAQs
What Temperature Kills A Fertilized Egg?
Fertilized eggs are extremely temperature-sensitive. Short exposure to high heat (around 104°F / 40°C or higher) or prolonged warmth above normal storage ranges before incubation can kill the embryo, while freezing temperatures will also stop development completely.
Can You Eat Eggs Right After A Chicken Lays Them?
Yes, you can eat eggs immediately after they’re laid, even while they’re still warm. For food safety, it’s best to cook them thoroughly so both the white and yolk are firm, especially if the eggs haven’t been washed or refrigerated.
How Do You Tell If A Chicken Egg Is Fertile?
The most practical way is candling, shining a bright light through the egg in a dark room to look for veins and a developing embryo. You can also crack an egg open and check the yolk; fertile eggs show a clear bullseye pattern.
Can You Put Dirty Eggs In An Incubator?
No. Dirty eggs carry bacteria that thrive in the warm, humid incubator environment, increasing the risk of embryo death or egg rupture that can contaminate the entire batch. Clean, intact shells are always the safer choice.